home || about me || tutorials || shop || my favorite blogs || home education

29 June 2011

Truett's Room

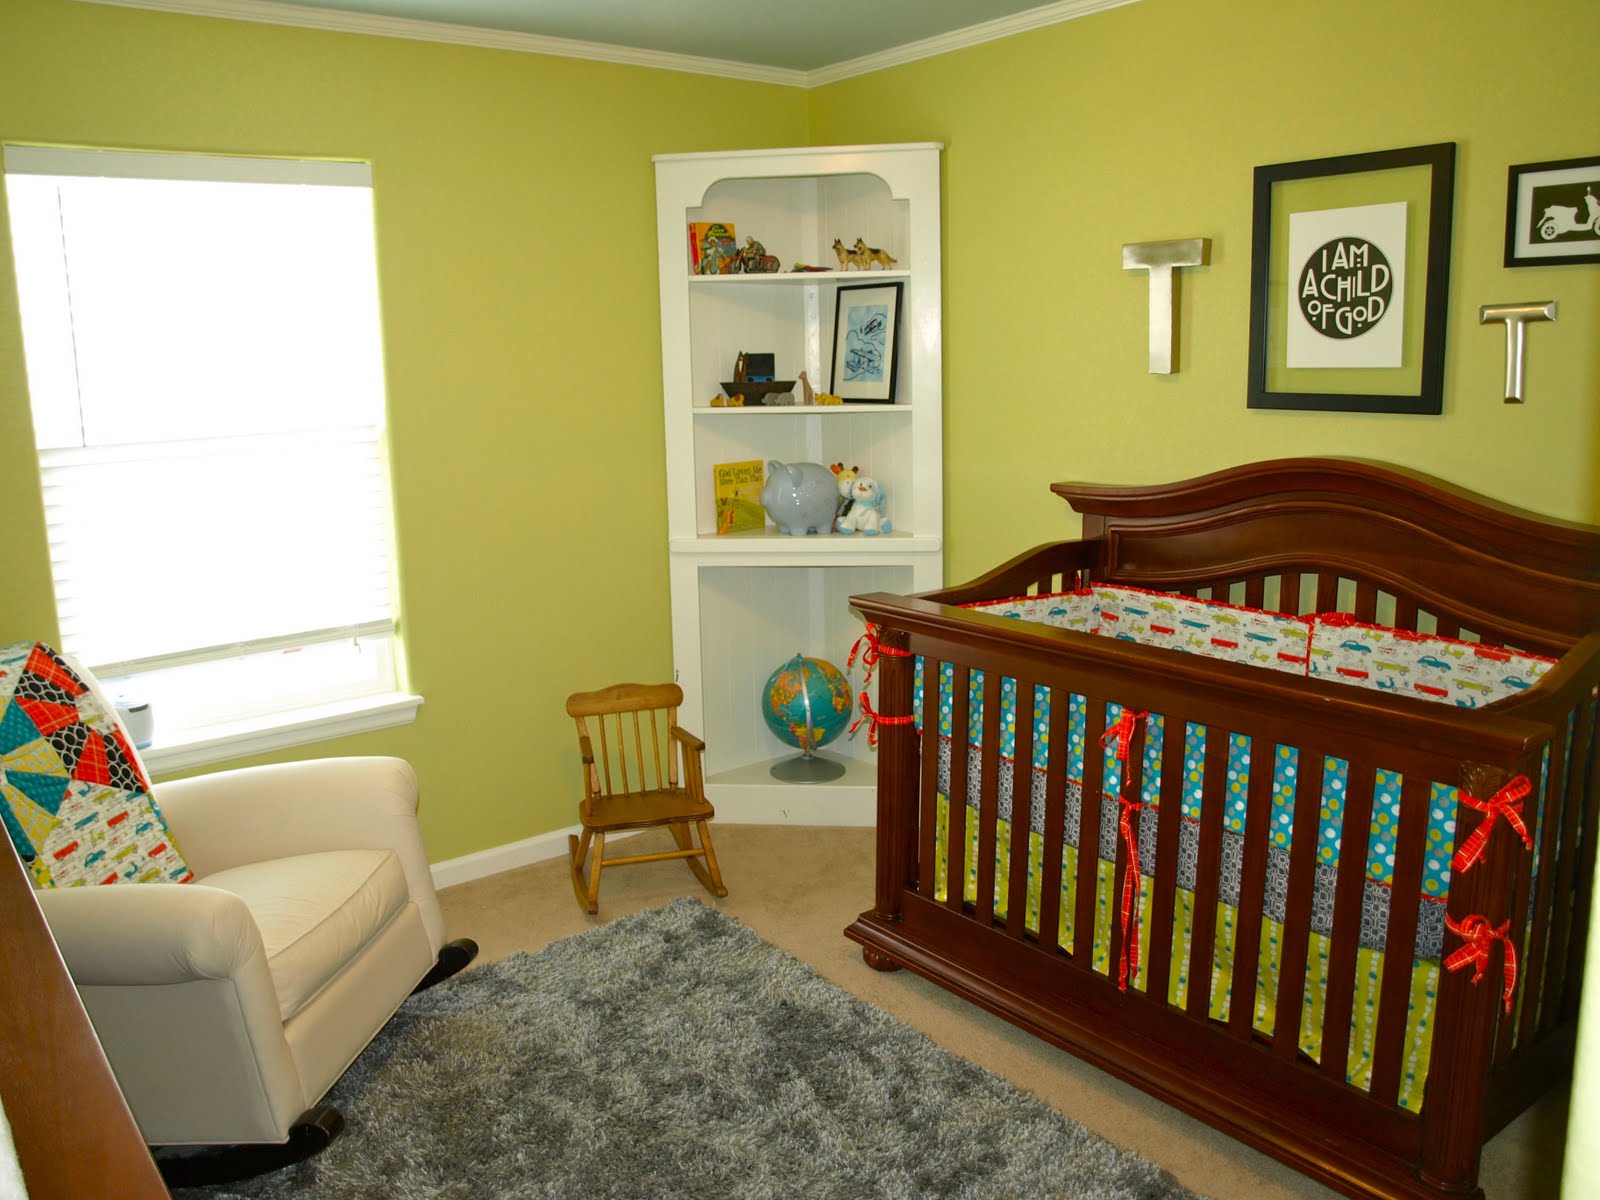
I am so excited to share Truett's nursery with you today! I have to admit that I was less than thrilled to decorate a boy's room after having such a great time with Maren's room. Then I found this fabric collection. I knew it would be a great jumping-off point for our little man's nursery. I chose to use the cars, pebble, and blue asterisk fabrics from the Birch Circa*50 collection. I found supplemental fabrics for the crib bedding and quilt from a fabulous little fabric boutique. Angie stocks a great selection of modern fabric, and I love being able to see and touch the colors and patterns before I commit. My mother-in-law generously offered to make the quilt and crib bedding. It was such a gift, and I love how it all turned out! The walls are Pale Avocado by Benjamin Moore. I can't remember what color the ceiling is, but I'm so glad we painted it. We found the crown molding on Craigslist for super cheap. Seriously, I think we paid about $10 for all of it. It was just wood and Brett painted it to match the rest of the trim in the house. I love how much it changes the room!

Let's start the tour!

We used the same furniture that was in Maren's nursery. The one thing we didn't buy the first time around was a comfortable chair. I found the Pottery Barn rocking chair on Craigslist for a song. I can't say enough good things about this chair. If you are having a baby...buy a nice chair! You will not regret it! The rug, lamp, basket for diaper-changing necessities, and black shelf are from Homegoods. I love that place. The shelf has little wood milk bottles, a vintage puzzle and a turquoise ball jar with dominoes...all toys that belonged to my dad at one point. I think vintage items that have special meaning are such treasures. The print above the chair is from Studio Mela and it's the sweetest thing.

The corner shelf isn't my favorite in here, but it will work until my sweet husband can execute my other vision for that space. *wink* There's a variety of fun little things on the shelf for now...a vintage globe from a thrift store, a piggy bank, a few more vintage toys, a neat picture from a dear friend, a special little carved Noah's ark that my grandpa made. I'll have to remember to get some close-up photos of those things someday. The little rocking chair was mine when I was a girl. I thought it would be nice for Maren to have a place to sit while I'm nursing Truett.

Isn't the crib bedding so fun?!


I love the simple little collage above the crib. I wanted to keep it neutral because I knew the bedding would be bold. The large 'T' is from here, and the smaller one from here. The 'I am a child of God' print came from here. I love Etsy, and was thrilled to support these great shops. I found the little scooter print at Target. I thought it added a little whimsy.

This is the quilt. Isn't it awesome?! The quilt pattern came from Modern Obsession: Modern Quilts with Traditional Roots. If you are a quilter and have not seen this book, you must take a look! It has some wonderful patterns and ideas.

The back of the quilt is even fabulous!
So, there you have it...one special room for a pretty amazing little guy. For now he's still sleeping in our room in a cradle, but he'll be spending some quality time in his room before long.

Thanks for stopping by!

26 June 2011

Where I've been...

I've been busy! Our sweet boy, Truett, arrived two weeks ago. I am in love! We're enjoying these early days as a family of 4. Now that his name is no longer a secret to family and friends, I look forward to sharing pictures of his completed nursery. For now I'm off to enjoy some lazy Sunday snuggles. *wink*

Thanks for stopping by!

02 June 2011

On learning to quilt

Happy June, friends!

I was thrilled to flip that last calendar page. With June came the opening of our community pool, a taste of some actual summer-like weather, the simplifying of our weekly calendar and the anticipation of the arrival of baby boy! Lord willing, we are somewhere within the 2-week waiting period, and we cannot wait to get our hands on this little guy! I've been doing my best to keep the house picked up, to finish up some creative projects and to enjoy each moment with Maren. I know our life is about to change in so many ways!

Some of the projects I've been working on have stemmed from a new little hobby I've picked up. A couple of months ago I took a leap out of my comfort zone and joined the Front Range Modern Quilt Guild. My mother-in-law is a seasoned quilter, and she invited me to join this new guild in our area. For the past several years I have enjoyed sewing, but making quilts seemed like such a significant undertaking. I had no idea how inspired I'd be by the other amazing women in the guild, and I've surprised myself with some of the projects I've taken on already. If you've ever been interested in learning to quilt, I highly recommend joining a local modern quilt guild. I've learned so much already, and I haven't felt any pressure or intimidation from the more experienced members of the group. It's been such an inspiring and fun creative outlet.

So...I introduce my first ever quiltish project...a sunny little mug rug for a guild swap. I have to admit, it was a little difficult for me to give this away! Thankfully, my partner seemed to love it. Our assignment was to make a summery mug rug. I completely made up the pattern and was thrilled with the way it came together!

I raw-edge appliqued the sun circles...

I wanted the actual quilting part to look like a sun with rays...
The mug rug was a great beginning quilting project. I learned so much, and it was small enough to finish quickly. I learned all the quilting steps without working on a monstrous project. I think my mug rug was about 7 in. by 9 in. finished. If you're interested in learning to quilt, I highly recommend starting with something like this!

I'm almost finished with my first larger quilt, and I can't wait to share it with you. As part of the guild, we were given a charm pack of Robert Kaufman Kona Cotton Solids. We had to make up a quilt using some of each color from the pack and one other fabric for the quilt top. Once the binding is stitched on, the quilt will be complete. So far I've loved my venture out into the quilting world.

Do you have a desire to learn a new creative hobby? I say go for it!

04 May 2011

You Are My Sunshine: A Canvas

Well, hello there! We've been busy around here the past couple of weeks, and I'm excited to finally share some of our accomplishments with you all. One project I'm thrilled to have done is our kids/guest bathroom. I'll share the big reveal soon, but for now I want to show you a fun little piece of art I made for the space.

We often sing You Are My Sunshine, and I used that as my inspiration for the bathroom. I wanted something fun and whimsical for this space, and it needed to be CHEAP!

Here's what I came up with...


I started with a blank 16x20 inch canvas. I picked up a package of 2 from Hobby Lobby. I think the package was originally $7.99 and I got it for 40% off, so the canvas ended up just being a couple of dollars. If you are a 'real' artist, please don't tell me how terrible cheap canvas' are. If my art starts to decompose in a few years, I'll come up with something new! And, if I decide to one day create some sort of masterpiece to last throughout time, I'll be sure to upgrade my canvas selection. Ha!

I started by painting the background of the canvas with acrylic paint mixed with some matte gel. The gel helps the paint to stretch a little farther, and it also gives the paint a little bit more dimension as it's applied. I used Thalo Green and Cerulean Blue.

This is the gel medium that I used. It's a little pricey, but a little goes a long way, and if you use a coupon or pick it up on sale, it's not so bad.

This is my fancy-schmancy artist palette. *wink* It's really just an old ice-cream lid. I dropped dollops of the Thalo Green and the gel on first.

Next, I mixed them up, but tried to leave some of the variance in color created when the paint and gel mix.

To lighten things up, I added a little Cerulean Blue.

Hopefully you can see some of the color dimension here, and the variances in the greenish-blueish colors I mixed.

I decided to use a circular 'pattern' as I applied the paint.

While the paint dried, I pulled out my alphabet stamps and some scrapbook paper to cut out the patterns and print out the words. You could also use different fonts on your computer to print words. I wanted a more random look to my canvas, so I was fine with the imperfections of using rubber stamps.

I used a small set of stamps to put 'are my' on a little piece of paper. I used these bigger stamps for the letters in 'sunshine'. I planned to cut them out, so I just randomly placed them on the paper. I love StazOn ink in Timber Brown. It's practically the only ink pad I use these days.

Here are my 'sunshine' letters all cut out.

I'm sorry I don't have pictures of how I cut out the rest of the pieces. It's not rocket science. I promise! The 'you' letters were just cut from a cute piece of alphabet scrapbook paper. You could use any type or combination of letters for your words. I didn't want things to look too uniform, and I used things I had on hand. I free-hand cut the sun and the little bird from scrapbook paper. If you wanted something more precise or exact, I'm sure you could use stencils, graphics found online, or even objects cut from a die-cutting machine like a Cricut or Silhouette.

I covered the entire canvas in Mod Podge and applied the first layer of papers. (*Make sure your paint is completely dry so things don't bleed!) I let that dry a bit, and then I added the other layers of paper to the sun and the bird, being careful all along to avoid wrinkles and bubbles in the paper. After everything was stuck in place, I finished with 4 or 5 more thin layers of Mod Podge. I knew the canvas would hang in the bathroom, so I wanted it to have a decent protective coat over all the papers.

You could go ahead and paint onto the edge of your canvas in the beginning, but I wanted to use ribbon around the edge. I used more Mod Podge to adhere the ribbon. I was sure the ends of the ribbon were relatively hidden on the bottom edge of the canvas. I singed the end of the ribbon so it wouldn't fray, and covered over the whole thing again with another layer of Mod Podge. Since the canvas was cheaper, there were a few uneven places that showed up when I was applying the ribbon. I just did my best to have things look smooth. I'm not too worried about small flaws...probably no one but me would ever even notice their existence!


Here's the finished canvas!

And another angle...
I had such a great time working on this piece. I'm thinking of the possibility of adding some other pieces of art like this to my Etsy store. Remember my Fruity Art? This felt like a slight variation of that project. I think I can only have so many of these types of things around my house without getting sick of the look, you know?

I'll be sharing my project over at these lovely blogs this week:

Today's Creative Blog

The DIY Show Off

Somewhat Simple

10 March 2011

Yellow Cane Chair (Revisited)

It's been a while since I've participated in The CSI Project. When I saw this week's theme (Slipcovers and Upholstery), I knew I wanted to share my sweet little yellow cane chair. If you've been around my blog for a while, you probably saw the original photos and tutorial for the chair back in September. If you're new here and would like more details about the project, check it out here.

This is where I started:

And what I ended up with:
I still love this chair, and we've enjoyed having the extra seat in our family room.

For more upholstery inspiration, be sure to stop by CSI this week!

Visit thecsiproject.com

08 March 2011

A Substitute

On Sunday I told you about a little spring cleaning challenge going on over at Simple Mom. Wouldn't you know this week's project happens to be one area of my house that I have actually tackled lately! I cleaned out my closet just a couple weeks ago. A sizable load went to Goodwill and a few nicer things got passed along to a friend. I finally parted with several pairs of favorite shoes that haven't fit since before Maren was born. Ugh...my feet grew an entire size with my first pregnancy. I'm hoping that won't be the case with baby #2! Anyhow, I actually have room in my closet now for all my 'normal' clothes as well as my pregnancy wardrobe. One perk of being a SAHM is that my clothing is quite simple. I have a few special things for wearing 'out' and a few things appropriate for church. The rest of the time I live in jeans. I'm also learning that it takes much less time to maintain my wardrobe if I keep things simple, as is the case with most areas of life!

SO, I decided to share another little area of my home that got a recent face-lift.

This picture is so embarrassing! I have another desk in my craft room that I use for sewing, and everything else happens right here. The space gets cluttered and messy very quickly depending on what sorts of projects I've been working on.


A couple of weeks ago I picked up this tiered garden stand at Pottery Barn. I normally wouldn't have spent so much on something like this, but I had a gift card, and this was what I wanted to get! It was on sale, which was nice. The trays are quite spacious, and I knew it would work perfectly as a storage solution on my desk. I already had a lazy-Susan on hand so I just set the 3-tiered stand on top and it fit perfectly.


I was able to fit all my tools on the stand...yeah! The little tray in the middle of the desk holds a few in-process projects and things that need to be fixed. I even had an extra spot for something decorative. I just need to find a picture for the frame. Hmmm...I wonder what it would take for Brett to paint the table for me? I've been imagining a nice, fresh green color. What do you think?


See how nicely everything fits on the stand? I love having easy access to things I use often without the clutter all over my workspace.

Thanks for stopping by!

06 March 2011

Project Simplify

As you may know by now, I'm just a few short months away from welcoming baby BOY into our family. My pregnancy nesting instincts combined with my usual spring cleaning urges are creating the perfect storm of clutter-busting around here these days. You can probably understand my excitement when I read about Simple Mom's Project Simplify.

If you haven't already done so, stop by Simple Mom for a little visit to see what the buzz is about. The first week of the project begins tomorrow, and I'm looking forward to finding out what this week's area will be.

On a different note, I've been doing a lot of sewing lately. I made Maren a darling little top, and on Friday I spent the day working on my first quilting project. I'm so excited to share both of those projects with you. I have found myself enjoying sewing projects recently. They seem to have a bit more longevity than some of my other crafty endeavors.

What's been your favorite creative outlet lately? Do you find yourself in 'seasons' of projects? Right now is definitely a sewing season for me!

Happy Sunday...I'll be back soon with pictures of Maren's new top!