home || about me || tutorials || shop || my favorite blogs || home education

07 June 2010

Let's Meet on Monday: My Movie Mixed Personality

We played hard outside this weekend, and allowed our worn-out selves to enjoy a couple of movies after sundown. Most often (ok, always!) my sweet husband allows me to do the movie-choosing. I pretty much like two kinds of movies: romantic comedies and comic-book-action-hero movies. We watched one of each this weekend, and I loved them both!

Leap Year was a sweet movie, and one I wouldn't mind owning. It was clean (rated PG), funny, quirky, and made my heart skip at all the right times. Our movie library is quite small, and I can't tell you how many times I've watched Sweet Home Alabama and Pride and Prejudice. I could use another chick-flick for those lazy Sunday afternoons in February. (When I'm not feeling particularly creative!) This one is going on my Christmas list.

Can I tell you how much I love the X-Men movies? I never get sick of them. Many people who know me in real life are surprised to find out about my soft-spot for super-hero movies. These ones are my favorite. Wolverine is the perfect mix of dangerous bad-boy and virtuous defender. I'm sure Brett is thankful for my fondness of something in the action genre!

Do you have a favorite type of movie? Are your interests surprising or predictable?

06 June 2010

Chi Gamma: June Edition

Last month I was part of the inaugural meeting of Chi Gamma. (Craft Group: the Greek started as a joke, but since we don't have a better name, it just might stick. Suggestions?) We all share some form or other of connection to one or more members, and we all like to spend time with other creative people. We plan to meet once a month, and the host gets to choose the craft and provide dessert. This month we met in Grace's beautiful home to decorate picture frames, and she made homemade Thin Mint cookies...mmmm! It was hot, and this was the perfect snack to munch on! (Thanks, Grace!)

Hard at work!

Our finished frames: (Note to self~get a closer picture of finished items...they were cute!)

I made a frame to give Brett for Father's Day. My aunt gave me a collection of old bottle caps a while back, and I thought this was the perfect use for a 'Dad's Root Beer' top.

Here are the simple steps we used:
  1. Paint around the edges, back, and inside rim of frame. (Allow to dry)
  2. Adhere paper of choice to frame with a thin layer of Mod Podge. (I used a bone-folder to get out all the wrinkles and bubbles...Allow to dry)
  3. Apply thin layer of Mod Podge to top of paper. (Dry again!)
  4. Using a heavier-duty craft glue, adhere various embellishments...in my case, bottle cap, scrabble tiles and leather ribbon. For the photo corners, I cut off the backs of ones that you lick to make sticky. I also used just a tiny bit of Mod Podge to stick them to the frame.


I love the way it turned out...I'm pretty sure it's masculine enough for Brett to display on his desk at work. *Wink!* I'll put a recent picture of Brett and Maren in the frame before I give it to him.

Do you have a group of crafty friends? Do you get together on a regular basis to make things? Do tell!

This post is linked to:

UndertheTableandDreaming
Join us Saturdays at tatertotsandjello.com for the weekend wrap up party!

04 June 2010

Making a Blog Button (for dummies)

I recently ventured out on quite the journey...I created my very own blog button. In all honesty, upon completion I felt as though I'd run a virtual marathon! I am so not a technical person, but I am learning a great deal as I go. For those of you who are anything like me, I thought I'd document what I learned. Maybe this will spare you some of the hair-pulling I experienced. Or, maybe everyone else out there in blog land is smart enough to make it through this process with flying colors. Please don't tell me if the latter is true!

So, step by step, this is what I did:

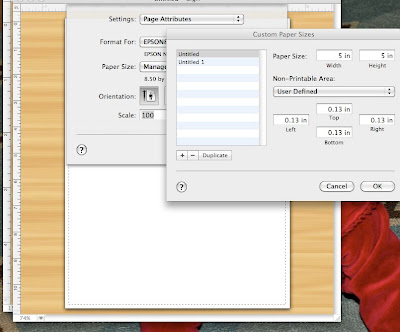
1. I do not have Photoshop, and I do have Print Shop 2 for my Mac. Again, this could be very archaic, but it's what worked for me! Open a new blank document, and select File-Page Setup-Paper Size-Manage Custom Sizes, and set your paper size to 5 in. by 5 in. (Most buttons are a square or circle, and this just helped me with parameters for while I was designing...no great reason for this size!)

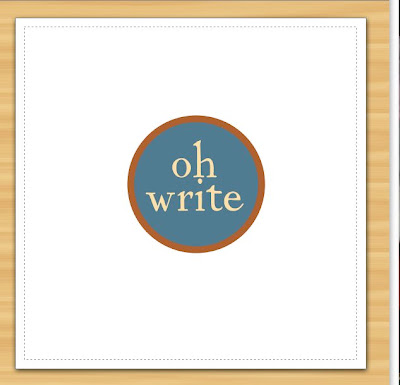
2. Design away! I chose to start with something simple that was true to the color and look of my blog. Someday I might get a fancy logo or more elaborate design, but for now this is what I came up with! Save your project as you go.

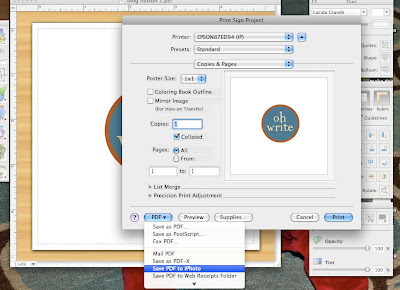
3. There are probably a million better ways to do this next step, but this is what I found to work for me! Select File-Print-PDF(this is a drop-down menu)-Save PDF to iPhoto. This miraculously turns your project into a .jpeg format that you can upload to Flickr.

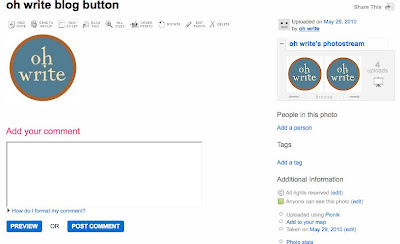
4. Upload your photo to Flickr.

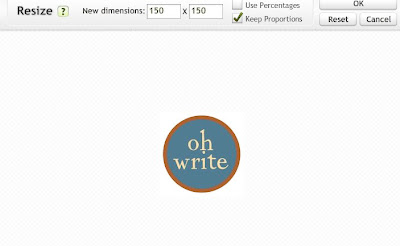
5. Once your .jpeg has been uploaded, select Edit-Resize, and set the dimensions to 150x150. This will make it so your image is the right size for a button. Next click OK, then Save.


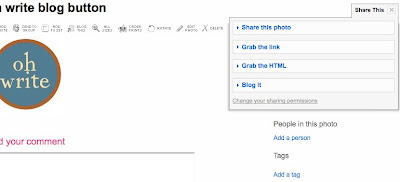
6. Double check to be sure 'anyone' can see this photo. Now click on Share This-Grab the HTML. This is the special code you will need to link back to the picture, which is stored on Flickr. Be sure to copy the entire thing. At this point, I just kept clicking back and forth between windows, but you might want to just copy and paste it into a word document so you have easy access to it for the rest of the process.


7. For the remainder of the process, I accessed two other blogs that I found to be extremely helpful. You can find them here:

www.musingsofahousewife.com (How to design a blog button)
www.jenieshell.blogspot.com (How to make a blog button)
www.jenieshell.blogspot.com (How to make a scroll box)
www.jenieshell.blogspot.com (How to display unreadable html code)

Between these 4 pages, I was able to make my button work! I did change a couple of things from the scroll box tutorial. Here is the code as I found it to work for me. (I centered it, changed the outline and the size from the original tutorial):

<center><div style="border: 1px solid black; overflow: auto; height:
50px; width: 100px; color: black; background-color: white;">YOUR TEXT HERE</div></center>

Happy button-making! I'd love to see what you come up with if this works for you!

For some more great DIY inspiration, stop by:

02 June 2010

Winner, winner!

Congrats, Homesteader! Email me with your address so I can get a package in the mail to you.

I'm working on another fun tutorial, so check back soon!


Random Integer Generator

Here are your random numbers:

2

Timestamp: 2010-06-02 18:57:06 UTC


01 June 2010

Maren's Kitchen

Last Christmas we decided to make Maren a little kitchen of her own. I had seen a few ideas here and there (I'm sure you have, too!), so I can't take complete credit for what we came up with.

We found this little footed nightstand on Craigslist for $15. Here's the best before picture I have. We had already sanded the top, but you can see how the piece looked in it's original form.

And, the completed kitchen:
We used wood craft circles and a square dowel for the burners. We painted wood nobs found in the craft store for the black nobs. The sink is a square cake pan and the faucet came from a salvage yard. Brett cut shelves to fit where the drawers had been, and cut and routered the back splash from a piece of shelving we had on hand. Hinges and handle for the oven came from Lowe's.

The inside of the oven is spray-painted shiny silver, and we have since added chains to both sides of the oven door to make it more sturdy. I made the little curtain rod with leftover fabric from M's nursery, and it's hanging on a small tension rod.

We estimate having spent close to $60 total, but definitely could have done the project for cheaper. Since this was a gift for our only child, we did splurge on a few things. (Namely the faucet...it cost $20, but we loved the size and the 'realness' it brought to the project! We also splurged on the handle for the oven door, and again, just loved the size and look of the one we chose.)

Be sure to leave a comment over here to be entered in my first ever giveaway!

Stop by this fine blog for more fabulous ideas and inspiration!


One from the Archives for:

Visit thecsiproject.com

31 May 2010

Let's Meet on Monday: The big 3-0 (and a little something for you!)

Giveaway is now closed!

I turned 30 this year. For some this is a traumatic milestone, but not for me. I am anticipating a fabulous fourth decade of life. I love the season of life I am in now. My days are filled with just enough of the unexpected to keep me on my toes, and just enough of the expected to make me feel 'at home'.

In celebration of my 30th birthday, I set a few goals for myself. In the coming year I plan to read 30 books, write letters to 30 influential people in my life, and memorize 30 Bible verses. The reading portion of my little plan has been the easiest. I love to read, and with this goal I have been more intentional about spending time with a good book.

Right now I am behind in my memorization and letter-writing. I have a terrible time with memorizing anything. I typically don't remember much about what I've read, heard, seen...where was I going with this? (*wink*) I wanted to challenge myself because I know it's not going to get any easier to memorize scripture as I get older. To be honest, writing this down now is giving me a boost of motivation to continue on!

As far as the letter-writing goes, I plan to complete a majority of these over the summer. I love to get real pen-and-paper mail. I believe it to be so special partly because it is a seldom-received treat and partly because it takes time and thought to produce such a gesture.

How about you? Are you a goal-setter? Have you had success or do you eventually abandon ship?

I realize this is a new blog, and I am excited to have a few followers already. If you're still reading, THANK YOU! And, how about a little giveaway? Leave a comment for one entry, and become a follower for another entry. (Be sure to tell me in a second comment if you follow!) I'll pick a lucky winner Wednesday morning.

In homage to a little show I like to watch, 'Want to know what you're playing for?' I will send you a little package of goodies from my Etsy store. Good luck!

28 May 2010

Garage Sales 101: Part 1

I maybe should call this little series Garage Sales: Elementary Edition, since I'm a relative beginner in the world of garage sale-ing. Garage Sales 101 seems to implicate more of a collegiate-level offering of information. Ah, well...either way it is garage sale season, and I wanted to walk you through how we're doing it here and now.

This is Maren and her $20 Fisher Price Little People collection we found on our first day out this season. The guy wanted to sell the lot together, and for $20 I couldn't refuse! I originally planned on re-selling the garage, but it's turned out to be Maren's favorite thing!
This will be my first year hosting a sale in our very own garage. For the past couple of years I have joined forces with a few friends, and we've had successful sales. Until now, I've been too chicken to branch out on my own. If you've never held a garage sale before, joining with a few others is a great way to start. It takes some of the pressure off of having a yard-full of stuff to sell, and it really is just plain old fun. (So long as you partner with people you'd actually like to spend a couple of mornings alongside!)

Maybe someday I will share a post on the best approach to group-garage-sales. I have definitely learned a few things!

Today I want to focus on STEP I: gathering items. In my opinion, one of the most overwhelming parts of garage sale preparation is the process of accumulating items to sell. Here are tips I have found helpful in this regard:
  • Start early! Don't wait for the weeks before the garage sale to clean out closets. I try to have all of my items set aside no later than 3 weeks before the sale. Those long winter days are great for sorting and cleaning! This will allow plenty of time for pricing and setting-up.
  • Keep it clean. All of my items go into the pile in 'ready-to-sell' fashion. Clothes are clean, dust is wiped off, small repairs are made as necessary. The nicer your items look, the more money they will bring in!
  • Have a place (or 2!) to put items aside for the sale. We have a two-story house, so I keep a box in a closet upstairs. I have found it to be far easier to toss an item in the box rather than carry it all the way to the basement. When the box fills up, I take a trip downstairs, where we keep the 'big pile'.
  • Throw as you go. You don't have to preform a major clean-sweep of your house all in one day. I toss things in the sale box as I find them. From time to time, I will go through a box in my craft room, or see something on a shelf that rarely gets used. It's amazing how much has accumulated in the garage sale pile without ever having a major go-though-closets-day.
This is my current closet pile. It's overflowing a bit now, but next week it all comes out for pricing!

Next week we'll talk about timing, pricing and shopping! Have you had a garage sale before? Do you spread out the preparation, or do it all in the week or two leading up to the sale?

And, just to leave you with a smile, here's Maren in her personally-selected outfit of the day. It's in the upper-80's here, but she insisted on wearing the boots. Oh, the lengths to which we go for beauty!