05 August 2010
Guess what?
I have some funky notecards featured in this lovely treasury. Stop by for a visit if you're in need of a unique hostess gift, or if you just like the color green!

03 August 2010
Shirt Refashion
I bought this top a couple summers ago at J.Crew to wear after my daughter was born. It was a great transition piece for those early post-pregnancy weeks, but recently I'd been feeling that it was a bit too tent-like and unflattering in it's original form. I spent an evening with my sewing machine, and this little number has wiggled it's way into my summer favorites once again!
Here's the before pic:

To refashion your own shirt, you'll need:

1. Use a seam-ripper to take out the stitching on one side of your top. I tore our 3 inches of the seam. If your top is longer, you could do more. If it's shorter, you might want to do less. I wanted to make sure that I wouldn't need to wear a tank under the shirt, so I only ripped up to the point where the shirt hung over my jeans. (Does that make sense? Feel free to email me with questions!)

2. Pin the fabric under on both sides of the ripped out seam. I only used one set of pins to catch both sides. (I found that pinning both sides separately was too cumbersome with all those pins.)

3. Next, sew around both sides, being sure to add a bit of extra support at the top. I back-stitched over the top of the 2 seams about 5 times. You could use any technique to be sure this seam is secured.

4. Cut the fabric for the sash. I cut 2 pieces that were 6 in. wide and 50 in. long. (To determine how long your sash should be, measure around your hips, and then add extra to account for the fullness of the bow you'd prefer. I wanted a full bow, so I made the sash quite long.)

5. Sew the 2 long pieces together to make an even longer piece, and press the seam open.

6. With right-sides of the fabric together, pin the sash along the entire length.

7. Sew along the rough edge of the sash. I wanted my ends to come to a gradual point, so I started by sewing on an angle. Leave the other end open and turn the sash right-side-out.

8. Trim the unfinished end to match the finished end, and turn the raw edge inside. Pin and stitch along the entire length of the sash. (You can see what the finished stitching will look like if you look at the picture in step 9)

9. Line up the middle of the sash on the side of the shirt without the torn-out-seam. Put a pin in the sash where you want the sash to line up with the edge of the torn-out-seam. (Example: When I measured around my hips where the shirt would hit, taking into account the thickness of jeans, I figured that I wanted the shirt to be 42 inches around when it was all tied. SO, each side where the sash and shirt were sewn together needed to be 21 inches.)

You can see here where I've pinned the middle of the sash to the left side of the shirt. My finger is pointing to the pin marking where I want the sash to attach to the right side of the shirt. (Am I still writing in English? I feel like this is sounding complicated. Sorry! It's really quite simple.)

10. Line up the right side of the shirt to the place on the sash you'd marked, and gather the rest of the shirt along the sash, pinning as you go. Sew around the top edge of the sash where it meets the shirt, being sure to back-stitch at the beginning and end.

11. Step back and admire your new shirt...much more unique and Anthropologie-esque.

I'll be linking up to these fine blogs:








Here's the before pic:

To refashion your own shirt, you'll need:
- a shirt (one that's fuller around the bottom would work best for this project)
- coordinating thread
- fabric to match the shirt (This fabric was linen, and it's washed and worn beautifully so far.)

1. Use a seam-ripper to take out the stitching on one side of your top. I tore our 3 inches of the seam. If your top is longer, you could do more. If it's shorter, you might want to do less. I wanted to make sure that I wouldn't need to wear a tank under the shirt, so I only ripped up to the point where the shirt hung over my jeans. (Does that make sense? Feel free to email me with questions!)

2. Pin the fabric under on both sides of the ripped out seam. I only used one set of pins to catch both sides. (I found that pinning both sides separately was too cumbersome with all those pins.)

3. Next, sew around both sides, being sure to add a bit of extra support at the top. I back-stitched over the top of the 2 seams about 5 times. You could use any technique to be sure this seam is secured.

4. Cut the fabric for the sash. I cut 2 pieces that were 6 in. wide and 50 in. long. (To determine how long your sash should be, measure around your hips, and then add extra to account for the fullness of the bow you'd prefer. I wanted a full bow, so I made the sash quite long.)

5. Sew the 2 long pieces together to make an even longer piece, and press the seam open.

6. With right-sides of the fabric together, pin the sash along the entire length.

7. Sew along the rough edge of the sash. I wanted my ends to come to a gradual point, so I started by sewing on an angle. Leave the other end open and turn the sash right-side-out.

8. Trim the unfinished end to match the finished end, and turn the raw edge inside. Pin and stitch along the entire length of the sash. (You can see what the finished stitching will look like if you look at the picture in step 9)

9. Line up the middle of the sash on the side of the shirt without the torn-out-seam. Put a pin in the sash where you want the sash to line up with the edge of the torn-out-seam. (Example: When I measured around my hips where the shirt would hit, taking into account the thickness of jeans, I figured that I wanted the shirt to be 42 inches around when it was all tied. SO, each side where the sash and shirt were sewn together needed to be 21 inches.)

You can see here where I've pinned the middle of the sash to the left side of the shirt. My finger is pointing to the pin marking where I want the sash to attach to the right side of the shirt. (Am I still writing in English? I feel like this is sounding complicated. Sorry! It's really quite simple.)

10. Line up the right side of the shirt to the place on the sash you'd marked, and gather the rest of the shirt along the sash, pinning as you go. Sew around the top edge of the sash where it meets the shirt, being sure to back-stitch at the beginning and end.

11. Step back and admire your new shirt...much more unique and Anthropologie-esque.

I'll be linking up to these fine blogs:
28 July 2010
Making the piano feel 'at home'
When we first moved in to this house, there were whitish walls everywhere, and a seemingly endless array of surfaces in need of decorating love. Meet my piano in the early stages of living here:

And, with a little tweaking and some much-needed height. (This wall is open to the second story, and it is tall!)

My two favorite people putting on a little Saturday morning concert:

I am a bit fickle when it comes to my house. The window frame and star found a new spot above the couch, and the vintage hat (was my grandma's!) is now on the mantle. Here is the piano as it stands today, complete with painted walls. (I love this color! It's kingsport gray by Benjamin Moore. We've found it to be plenty rich without being too dark.) The little motorcycle guy was my dad's, the quilt pieces were made by my great-grandma, and the coffee tins were a hand-me-down from my aunt. I am especially drawn to objects that carry some sort of meaning or sentiment. It's what makes me happy!

Check out these places for more cool ideas:
Home
It's been busy around here lately! I feel so blessed to have had so many wonderful people drop in for a visit at oh write. If you're a recent follower, thank you! It really is an honor to share parts of my life with you.
You know what's funny? I haven't even been 'here' for an entire month. Maren and I have been in Michigan visiting family. I did spend a bit of time on my computer, but mostly we've been doing this:
 And this:
 And some of this:
 We came back home to Colorado with plenty of treasured memories. Now I'm busy doing laundry, cleaning, working on some new things for my Etsy store, and putting together a few new tutorials and some fun decorating posts. I'm also working on some guest posts for a couple of lovely blogs.
Thank you again for joining me on this fun little endeavor, and happy summer!
You know what's funny? I haven't even been 'here' for an entire month. Maren and I have been in Michigan visiting family. I did spend a bit of time on my computer, but mostly we've been doing this:
 And this:
 And some of this:
 We came back home to Colorado with plenty of treasured memories. Now I'm busy doing laundry, cleaning, working on some new things for my Etsy store, and putting together a few new tutorials and some fun decorating posts. I'm also working on some guest posts for a couple of lovely blogs.
Thank you again for joining me on this fun little endeavor, and happy summer!
15 July 2010
Making a Bird's Nest
Remember this post? My poor melting candles needed to be replaced with something able to withstand the hot morning sun. Jennifer suggested a bird's nest, and I set out to create something just right for my hanging lantern. (*Confession: I was hoping to find a pre-made nest for purchase, but had NO luck. This turned out to be a good thing, as I'm quite tickled with how this one turned out!)
To make a nest, you will need:
 1. Cut your cardboard to the size of the wreath. Make sure there's enough overlap to hot-glue the cardboard to the wreath without having the cardboard extend beyond the wreath's edges.

2. Run a bead of hot glue around the edge of the cardboard. Be generous!

I had to apply pressure to the cardboard for quite a while to ensure the glue was doing it's job.

3. My stones were already a pretty color to resemble eggs. If you're using rocks and need to paint them light blue or green, do that before you begin the rest of the project. To attain the speckled egg look, I used watered-down paint and an old toothbrush.

Dip your brush in the paint, and use your thumb to flick the paint. Test the technique out a couple of times on some scrap paper first until you are pleased with your results.

Now transform your rocks into little speckled eggs!

4. I must have skipped taking pictures of how I applied the moss. I just used hot glue to apply the moss in a random way on the wreath/cardboard. I continued to layer the moss until I had the cardboard completely covered. I was sure to leave enough of the wreath visible, as it's what makes this look like a more genuine bird's nest.
5. Now nestle your eggs into the moss, and admire your work.

Here's my nest in it's new environment. I think it's the perfect solution to my melting candles conundrum.

I love the pops of blue and green added by the rocks and moss. I think it makes just enough of a statement in my hanging lantern.


I'm linking to these wonderful parties this week:
To make a nest, you will need:
- A small grapevine wreath
- Moss
- Cardboard scrap the size of your wreath
- Eggs or stones to paint as eggs
- Paint (if you plan to paint stones to resemble eggs)
 1. Cut your cardboard to the size of the wreath. Make sure there's enough overlap to hot-glue the cardboard to the wreath without having the cardboard extend beyond the wreath's edges.

2. Run a bead of hot glue around the edge of the cardboard. Be generous!

I had to apply pressure to the cardboard for quite a while to ensure the glue was doing it's job.

3. My stones were already a pretty color to resemble eggs. If you're using rocks and need to paint them light blue or green, do that before you begin the rest of the project. To attain the speckled egg look, I used watered-down paint and an old toothbrush.

Dip your brush in the paint, and use your thumb to flick the paint. Test the technique out a couple of times on some scrap paper first until you are pleased with your results.
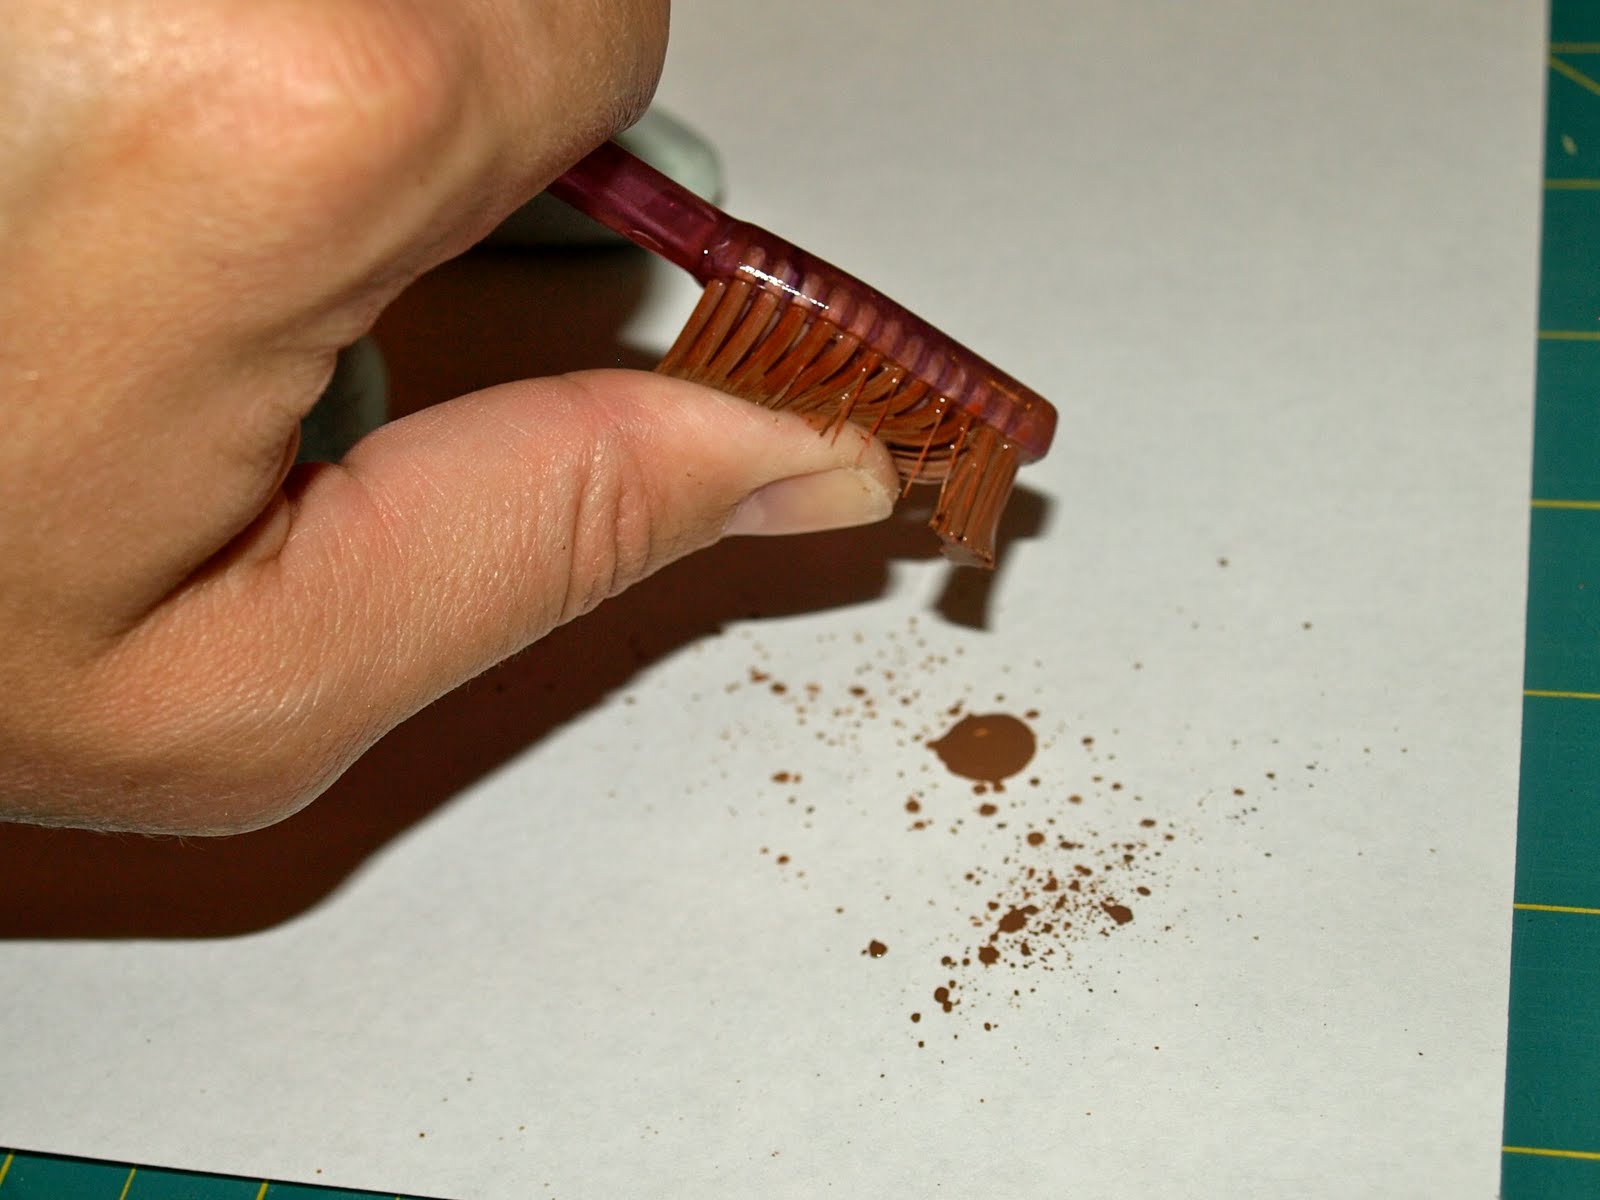
Now transform your rocks into little speckled eggs!

4. I must have skipped taking pictures of how I applied the moss. I just used hot glue to apply the moss in a random way on the wreath/cardboard. I continued to layer the moss until I had the cardboard completely covered. I was sure to leave enough of the wreath visible, as it's what makes this look like a more genuine bird's nest.
5. Now nestle your eggs into the moss, and admire your work.

Here's my nest in it's new environment. I think it's the perfect solution to my melting candles conundrum.

I love the pops of blue and green added by the rocks and moss. I think it makes just enough of a statement in my hanging lantern.


I'm linking to these wonderful parties this week:
Subscribe to:
Posts (Atom)